
Ever looked at a wall so pockmarked that it appeared to be from a funhouse? Irregular textures and coarse spots are too frequent in business places, and they immediately remove the shine from a professional environment.
That’s where proper skim coating tools and skim coating materials enter the picture. With the right equipment in place, you can turn rough surfaces into smooth, paint-ready walls that present a clean and high-quality finish. This guide will take you through the basics of your convenient skim coating principles to creating quick, error-free results on any job site.
Important Skim Coating Tools
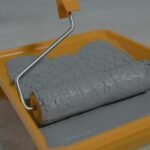
In terms of attaining the perfect finish, the appropriate skim coating tools are important. Which includes skimming blades (10″ to 24″), drywall knives (10–12″), a mud bucket or pan, a mixing paddle drill-mounted, sanding blocks or screens, and a paint roller with an extension pole. These tools are the foundation of any skim coating operation.
Every instrument has its purpose. Broad blades allow you to cover greater areas in less time and prevent lap marks. A mud pan keeps your compound convenient to reach and untainted. The mixing paddle keeps your skim coating materials, usually joint compound, smooth and lump-free, and is the secret to achieving an even finish.
Don’t forget the sanding equipment and a heavy roller to apply compound fast on big surfaces. Utilizing good-quality skim coating tools not only simplifies your work but also enhances the finish and overall speed of your commercial jobs.
Advanced Finishing Tools
For professional-grade skim coatings, a couple of specialized skim coating tools are just what the job requires. Magic trowels are excellent for applying compound across broad surfaces with little effort. Corner knives neatly complete inside angles, and a hawk keeps the compound within easy reach. Utility knives are needed to prepare and clean edges neatly prior to application.
When shooting for a Level 5 finish, super smooth and paint-perfect, contractors count on these tools for accuracy. In addition to your main skim coating materials, always wear protective gear such as masks, goggles, and gloves. Skim coating generates a lot of dust for the amount of work being done, and safeguarding your lungs and eyes is not optional.
Vital Skim Coating Materials
Your finish is only as fine as the skim coating products you use. Most projects begin with a joint compound, either setting-type or all-purpose. All-purpose compound is pre-mixed, simple to apply, and ideal for beginners. Setting-type powders are faster and harder to dry. However, they are the best choice for professionals with tight deadlines or high-traffic spaces.
Primers and adhesives also come to the rescue. The right primer can seal out porous surfaces, providing your compound with a smooth surface to adhere to. Bonding agents are particularly helpful when skim coating over glossy paint, concrete, or old paper—the kinds of things that can be resistant to adhesion.
Don’t overlook the basics. Your skim coating tools only work well if paired with the right setup: dust-free compound, drop cloths, painter’s tape, and mixing water. These skim coating materials help reduce mess, improve adhesion, and ensure you’re working cleanly and efficiently on every coat.
Mixing And Material Prep
Achieving the perfect consistency is the key to a smooth skim coat. Most experts liken ideal joint compound texture to yogurt or pancake batter, meaning not runny, not too thick. This is what allows the compound to slide on smoothly without sagging or piling on your blade. It also promotes even coverage on the surface.
Use a drill-mounted mixing paddle to blend your skim coating materials thoroughly. Hand-mixing can leave lumps, which lead to drag marks and wasted time sanding. A good mix should be silky and uniform, with no dry pockets or bubbles. Keep your skim coating tools clean during this step to avoid contaminating the batch.
Prior to applying anything, don’t forget priming. It prepares the surface by closing porous areas and minimizing uneven absorption. This improves adhesion and allows the compound to stick correctly, crucial for a professional finish. The proper prep makes each section of your skim coating installation more straightforward and cleaner.
Application Techniques
Rolling Base
Begin by filling your roller or mud pan with blended skim coating material. Roll the compound on the wall in sections large enough to be manageable. Then proceed at once with a skimming blade 10″ to 24″ wide to even out the surface. This process accelerates coverage and is ideal for big commercial jobs employing professional skim coating tools.
Alternate Passes
Put on your first coat in a vertical motion, allow it to dry, then skim your second coat horizontally. Reversing the direction between coats smooths out blemishes and reduces ridges. Special skim coating equipment, such as wide blades with a bit of flex, makes it easier to feather the edges. Allow each layer to dry completely before applying the next coat.
Pro Tips
Always clean your blades and mud pan between passes, as dry compound results in streaks. Stay away from lap marks by applying steady pressure and overlapping slightly with each pass. Clean up edges or corners with a damp cloth. These little things make a huge difference in your end skim coating material finish.
Sanding And Finishing
Keep sanding to a minimum if your skim coating technique and tools are sharp—let the blade smooth it out, not the sandpaper. For touch-ups, apply a sanding block or screen in combination with a damp sponge to remove fine lines. Don’t forget the mask and goggles because dust from dried skim coating materials can be fierce. Close off the area to contain the mess and keep your workspace clean.
Tool Maintenance And Care
Maintaining your skim coating tools guarantees they remain like new. Clean blades and knives immediately after use to prevent dried compound and rust. Blunt tools destroy finishes, so sharpen or replace them frequently. Keep your basic skim coating materials and tools in a dry, neat area to make them last longer.
Final Thoughts
The secret to flawless walls lies in using the right skim coating tools and reliable skim coating materials. With proper prep, consistent mixing, and pro-grade equipment, you’ll get smoother finishes and save time. Invest wisely — because better tools mean cleaner work, fewer do-overs, and results that speak for themselves on every job.