
Think about looking up at a level, smooth, and flawless ceiling and how that would change the entire look of the room. This is the beauty of skim coating a ceiling, which has become more popular in recent renovations.
Whether your ceiling has cracks, old textures, or dents, skim coating ceilings is an efficient way to achieve that premium look. A skim coat, especially for ceilings, is an excellent way to obtain a smooth ceiling finish that improves the appearance and resale of your home. The following will prepare you for the steps, mistakes, tools, and techniques to achieve a perfect ceiling.
Understanding Skim Coating Ceilings
Skim coating ceilings is the process of applying a thin layer of joint compound or plaster to correct imperfections, smooth textures, and prepare the surface for painting. It’s especially effective for ceilings with minor cracks, dents, or uneven textures, turning outdated surfaces into a modern, sleek backdrop.
Materials for Skim Coating
Materials used in skim coating ceilings include premixed or powdered joint compounds. Lightweight, quick-setting compounds are ideal for overhead surfaces because they reduce strain and dry faster. Some compounds include additives to improve adhesion and flexibility, helping prevent cracks over time.
Preparing Your Ceiling
For the best results, ceilings should be clean, dry, and free from peeling paint or loose debris. Applying skim coating ceilings under these conditions guarantees a uniform, smooth ceiling finish that lasts for years and is ready for priming or painting.
Step-by-Step Guide to Skim Coating Ceilings
Preparation
The most important step to a perfect, smooth ceiling finish is preparation. Remove any texture, peeling paint, and any plaster that is loose. Sand any rough areas and wash the surface to get rid of dust and dirt. This is essential for the compound to adhere uniformly and helps to avoid seeing lumps or imperfections when the coats dry.
Application Process
- Mixing the Compound — Following the manufacturer’s guidelines for mixing, the joint compound should be creamy and not runny to allow for smooth application.
- First Coat — Apply a thin, even coat of compound over the ceiling with a wide drywall knife. Work in small sections to create a consistent and streak-free application.
- Sanding — After the first coat has dried, sand it lightly with a fine-grit sandpaper or sanding sponge to eliminate minor imperfections.
- Additional Coats — Apply one or two more thin coats, sanding between each coat, until the ceiling is completely smooth.
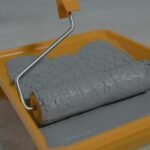
Tools Required
- Drywall knives (6–12 inches for large areas, 4–6 inches for corners)
- Rollers for applying compound evenly over broad sections
- Sanding tools with fine-grit sandpaper
- Optional: corner tools for sharp edges and professional finishes
By following these steps carefully, you will be able to achieve a smooth ceiling finish that looks as good as a professionally done renovation.
Achieving a Level 5 Finish
A Level 5 finish is the top quality for ceiling renovations and gives you the smoothest surface to paint on. It is recommended for areas that have glossy paints or strong lighting. These areas tend to showcase even the tiniest imperfections. To achieve a level 5 finish, it requires a series of thinner layers of skim coating ceilings with precise application and an extensive sanding process.
Techniques to achieve this include:
- You can use a long drywall knife to achieve an even, wide coverage
- Try to apply multiple thin layers instead of one thick coat
- Make sure to sand carefully between each layer so that you can prevent scratches or dips
- Priming the ceiling before painting to guarantee uniform paint absorption
The end result is a perfect, smooth ceiling finish, giving it an upgraded and modern appearance, which adds to the overall look and worth of the room. It does take patience and careful execution to achieve, but the final outcome is able to rival those of professional ceilings.
Common Mistakes to Avoid
Even if you are an experienced renovationist, there are times when you can make mistakes that compromise a smooth ceiling finish. Just being aware of these mistakes can help you save time, effort, and frustration during your projects.
Over-application of Compound
When you apply too thick a layer of joint compound, it can lead to cracking or sagging after it dries. To prevent this, use thin, even layers of coats and build your way up gradually to guarantee a flawless, smooth ceiling finish.
Insufficient Drying Time
Speeding between coats can lead to uneven surfaces or bubbling. Allow each of your layers to fully dry before sanding or applying the next layer, making sure enough time has passed for the compound to cure properly.
Improper Sanding
Being too aggressive during the sanding can also damage the layers, while insufficient sanding leaves bumps and imperfections. You can use fine-grit sandpaper or a sanding sponge and check your work under good lighting.
Skipping Primer
Not priming before painting can result in uneven absorption, discoloration, and a dull finish. Always apply a quality primer to enhance adhesion and preserve the smooth appearance of your skim coating ceilings.
Ignoring Edge and Corner Detailing
Corners and edges also require careful attention. When you neglect them, they can make your ceiling look unfinished even if the main surface is flawless. Use corner tools or smaller knives for precise application.
Maintenance and Longevity
After finishing your skim coating ceilings project, proper maintenance will help you preserve the smooth ceiling finish. You will need to dust and clean the ceiling regularly, so you can prevent grime buildup. Address small cracks or dents promptly with a touch-up compound to avoid larger problems. When repainting, lightly sand and prime the surface for optimal paint adhesion, ensuring the ceiling retains its flawless appearance.
Elevate Your Ceiling Aesthetics
By utilizing skim coating you can achieve a contemporary, flawless ceiling that not only complements your décor but also makes them shine. With the end result being a smooth ceiling finish that elevates the room’s overall style, impresses guests, and adds lasting value. Your ceilings deserve this professional touch.