
Thinking about refreshing your old wall, but having a difficult time because of the bumpy, caked, or uneven paint. It’s an all too familiar issue that a lot of businesses and homeowners have to face, and the big reason behind the popularity of skim coating over paint.
It doesn’t matter if you are preparing for a rental, updating your office, or just doing a DIY project; smooth walls make all the difference. In contemporary times, where lighting and home trends favor clean lines and modern finishes, skim coating has become more common than ever before.
Moreover, when this process is paired with smart repairing ideas, it can transform even a dull surface into sleek, flawless spaces ready for a fresh coat of paint. But when is it really necessary? Let’s find out.
What Is Skim Coating And Why Over Existing Paint?
Skim coating is a procedure where contractors apply a thin layer of joint mixture over walls or ceilings. Its primary goal is to create a smooth surface, hiding imperfections like texture patterns, patchwork scars, or uneven paint layers. Unlike patching isolated holes or cracks, skim coating covers the entire surface, giving you what’s called a Level 5 drywall finish.
So why apply a skim coat over paint? Sometimes, old paint jobs leave behind roller marks, poor brush strokes, or raised textures that primer and paint alone can’t hide. Skim coating becomes necessary when previous paint layers have degraded, cracked, or been layered unevenly over the years.
It’s especially important in homes where lighting, like recessed LEDs or picture windows, accentuates surface flaws. If your goal is a professional, flawless finish before repainting, this process is often the missing link in your repainting preparation tips checklist.
When Skim Coating Over Paint Becomes Necessary
Not every repainting project requires skim coating, but certain conditions make it indispensable. One common reason is removing textured finishes like popcorn or knockdown ceilings and walls. After scraping off the texture, the underlying surface is often too damaged or uneven for a simple repaint.
Another condition is wallpaper removal. Even when adhesive is cleaned off, painted drywall underneath usually suffers from nicks and gouges, making a skim coat necessary to get a smooth finish. Water stains, peeling paint, and poorly patched drywall also require attention. If your room has acute lighting, where flaws become visible under direct or raking light, a Level 5 skim coat helps achieve the flawless look designers recommend.
Meaning, skim coating over paint becomes necessary when the surface anomalies are too vast for simple patching and priming to resolve, especially when aiming for a premium finish in contemporary spaces.
Preparation Steps (Repainting Preparation Tips)
Before you dive into skim coating over paint, surface prep is critical for success.
- Start by washing the walls to remove dirt, oils, and dust. Use warm water with mild soap or a degreaser like TSP for tough stains.
- Once dry, lightly sand the painted surface to dull any gloss, improving compound adhesion.
- Priming is the next important step. Apply a drywall primer or stain-blocking primer to seal the old paint and prevent joint compound from peeling.
- For glossy or oil-based paints, an oil-based primer works best. These repainting rehearsal tips guarantee your skim coat bonds well and won’t bubble or crack later.
- Next, mix your joint compound to a consistency like pancake batter or toothpaste. Test on a small area before starting the full job.
Tape off trim and protect your floors, skim coating can be messy! These preparation steps set the stage for a smooth application process and help prevent common DIY frustrations like cracking, peeling, or uneven drying.
Application Process
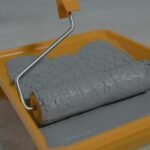
Applying a skim coat over existing paint is a step-by-step process requiring the right tools and patience. Start by using a ¾-inch nap roller to spread thinned joint compound across the wall in manageable sections. Then, use a wide skim blade or drywall knife to smooth the compound, applying even pressure to create a uniform layer.
Allow the first coat to dry fully, usually overnight. Once dry, lightly sand with 150- to 220-grit sandpaper to remove ridges and imperfections. Repeat the process with a second, and sometimes a third coat, alternating your smoothing direction to prevent visible seams.
Throughout the job, keep your tools clean and your compound moist. A spray bottle can help maintain workability on dry days. Proper technique and thin layers are key to avoiding bubbles and drag marks.
By the final coat, your walls should be nearly flawless and ready for priming. Skim coating over paint requires attention to detail, but the end result is a perfectly smooth surface that looks professionally finished, making it a standout among repainting preparation tips.
Pros And Cons of Skimming Over Paint
Skim coating has clear benefits. It creates a smooth, flawless finish that improves the adhesion and appearance of new paint. It’s the go-to choice for hiding significant wall flaws and achieving a high-end, professional look, especially in modern spaces with bright lighting.
However, it comes with trade-offs. Skim coating over paint is labor-intensive, often requiring multiple coats, sanding, and substantial drying time. DIYers may face a learning curve, and hiring a pro adds to project costs. Still, when done correctly, it eliminates the imperfections that paint alone can’t hide, making it one of the most worthwhile repainting preparation tips.
Options And When to Skip Skim Coating
If your painted walls are mostly smooth with only minor flaws, you may not need a full skim coat. Instead, apply a high-build primer designed to fill small imperfections and create a uniform surface. Products like Benjamin Moore’s Ultra Spec Prep Coat can level minor textures effectively.
In cases where walls aren’t subject to harsh lighting or close scrutiny, a Level 4 drywall finish (basic tape, mud, and sand) is usually enough. Basic patching and sanding, followed by a primer and topcoat, will give acceptable results for many home interiors, making skim coating optional in lower-impact areas.
Final Prep Before Painting
Once your skim coat is complete, apply a final coat of drywall primer to seal the surface and improve paint adhesion. Lightly sand the walls with fine-grit sandpaper and wipe them clean with a tack cloth. This final prep assures that your new paint finish looks crisp, smooth, and professional.
Smooth Walls, Smart Choice
Skim coating over paint changes tired, uneven walls into smooth surfaces ready for fresh color. It’s a smart step when perfection matters. Use these repainting preparation tips to decide if your walls need a full skim coat or just a primer touch-up. Either way, smooth walls always make a bold impression.