
Ever gazed at a wall that resembled more of a moon’s surface than your actual office wall? All those bumps, cracks, and texture imperfections kill the ambiance in no time. Whether it is a chaotic hallway or a luxury boardroom, smooth surfaces immediately give a room a polished and professional feel.
That’s where professional skim coating comes in. This step-by-step approach transforms uneven walls and ceilings into flawless, paint-ready surfaces. However, getting it right requires more than just slapping on joint compound — this procedure demands preparation, precision, and the right techniques to achieve the ideal look you are looking for. In this guide, we’ll break down the skim coating process to help you reach pro-level results.
Preparation And Safety
Surface Prep
A good professional skim coating job begins with a clean, solid surface. Dust and dirt keep the compound from adhering, so clean everything off. Fill in the cracks and dents with patching compound, and remove any peeling paint or texture. This prep will make your skim coating project go on without a hitch and last longer.
Safety Gear
Safety first! During professional skim coating, you’ll kick up dust and fine particles. Wear a dust mask, safety goggles, and gloves to protect your lungs, eyes, and skin. Good lighting helps spot imperfections early, making your skim coating process easier and safer from start to finish.
Prime First
Prior to applying your professional skim coat, it’s wise to prime the surface. Primer closes porous surfaces and causes the compound to adhere evenly. Not doing so often results in streaky coverage or accelerated wear. Think of priming as the behind-the-scenes hero of a perfect skim coating job.
Mixing Compound And Tools
The key to successful professional skim coating is getting your mix just right. Your mix should have the consistency of yogurt or pancake batter, neither too thick nor too thin. If your mix is too dry, it will pull across the wall. If it’s too wet, it won’t create the smooth finish you’re looking for from a good skim coating process.
To get that ideal texture, professionals use a drill-mounted paddle. This mixer blends the joint compound evenly and smoothly, preventing you from getting lumps that could sabotage your work later. Whether with all-purpose mud or a speedy-setting mix, uniform blending makes your professional skim coating faster and neater.
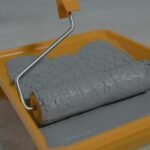
Furthermore, don’t forget the necessary tools. You’ll need wide skimming blades (10–24 inches), drywall knives, rollers with a mud pan, and a sturdy trowel. These tools turn an ordinary skim coating process into a smooth, professional-quality finish every time.
Rolling And First Coat Application
Begin your professional skim coating by subdividing the surface into workable pieces. Apply the compound generously to walls or ceilings using a thick-nap roller. Rolling the mud smooth in an even fashion provides you with an even base coat to work from for your initial application. Skim coating in this manner simplifies covering large commercial areas quicker and more efficiently.
Work on keeping edges moist as you go. Dry seams between sections can result in lines where the coating has dried and visible spots once the coating is dry. Smooth transitions are what professional skim coating is all about, and controlling your working rate guarantees your skim coat process is clean and seamless throughout.
After rolling on the mud, pick up your wide skimming blade and draw it over the surface firmly. This flattens out the compound and eliminates any roller texture. One smooth pass now equals less sanding down the road, plus a neater, more efficient professional skim coating overall.
Skimming And Smoothing Techniques
In the professional skim coating industry, broad blades are your friend. Skimming with 12″–32″ blades allows you to complete more surface area with fewer passes, leaving a smoother finish. Pass the blade along the surface under steady pressure to level out the compound evenly. This step in the skim coating process creates the perfect appearance your project requires.
For the second and third coats, switch up your stroke direction. If your first coat ran horizontally, apply the next vertically. This alternating approach helps level out ridges and fills in low spots from the previous layer. With each step of the professional skim coating, you’re getting closer to that glass-smooth wall finish.
Also, don’t allow compounds to accumulate on the edges of your blade. Clean it periodically to prevent drag marks and wavy lines. Sharp edges are the difference between good and great results in your final skim coat process.
Multiple Coats And Drying
The ideal professional skim coating will take 2 to 3 coats. Put each coat down in a different direction, i.e., horizontal before vertical, in order to fill gaps and level the surface uniformly. This crisscrossing is an important aspect of a perfect skim coating process, producing your finish smooth and even.
Patience is key between coats. Allow the skim coat to dry completely, which typically takes 12 to 24 hours, depending on temperature and humidity. Scrape down any high spots or rough areas lightly before applying the next layer. That extra care keeps your clean, professional skim coating ready for the next step.
Finishing Touches And Sanding
The secret to a professional skim coating finish is less sanding and more smoothing with your blade. If you’ve applied your layers carefully, you’ll only need light touch-ups to knock down small ridges. Plus, oversanding wastes time and creates dust, making your skim coating process messier than necessary.
For a final touch, use a sanding block or screen and lightly smooth out defects. A damp sponge is effective in capturing fine dust without scratching your work. Shine critical lighting on the wall and use a straightedge to detect defects prior to painting. This step guarantees your professional skim coating appears perfect in every light.
Priming And Final Prep
Your last step in your professional skim coating is preparing for the finish. Clean your walls with a wipe to remove dust, then prime with a high-build to seal the surface and provide an even foundation for paint or paper. This essential step secures your skim coating process and avoids uneven absorption of paint. Cap it off with a close inspection under bright work lights to identify any final flaws before declaring the job complete.
To Sum It Up
A smooth, long-lasting finish results from being diligent in following the entire skim coating process. Prepare your surfaces, mix accurately, apply evenly in layers, and use good lighting. With patience and proper tool care, professional skim coating can transform walls into flawless surfaces that are truly remarkable. Learn the fundamentals, and your work will do the talking.