When you’re trying for that perfect, flat, glass-smooth wall, sometimes the room air doesn’t cooperate. If the air is too warm, the skim coat may crack before your eyes. If too moist, it may never actually dry. This is why information on skim coating temperature humidity, and skim coating drying conditions is going to be fundamental to achieving high-quality, professional results every time.
Whether you are a contractor or a weekend DIYer, this guide to working with temperature and humidity – and what the professionals do to get controlled temperature and humidity – will explain how it will affect your finish.
Why Environment Matters For Skim Coats
A skim coat is a thin, water-based layer applied to create level, smooth, or repaired surfaces. The performance of a skim coat is dependent upon two forces: the amount of moisture escaping the material and how the compound chemically hardens.
When either the moisture escaping method or the hardening method is disrupted through cold air, hot drafts, or too much moisture, you begin to see problems. Cracks, loss of adhesion, extended drying, and paint that won’t stick.
Such aspects will allow you to better control your setting prior to mixing a batch. In this article, we are going to cover limits with handling, heat, humidity, air movement, and uncomplicated things that will help to keep your walls looking good.
Temperature — What Range Is Safe?
Minimum Temperatures To Avoid Freeze Or Slow Set
Most gypsum and plaster skim materials should be applied at temperatures above approximately 5–10°C (41–50°F). Below these temperatures, the chemical reaction that causes the material to set will slow down significantly — or stop.
Cold substrates can also lead to condensation on the surface, preventing the coat from bonding as it should. Always bring the working conditions and the products themselves to at least room temperature before you begin.
Maximum Temperatures And Too-Fast Drying
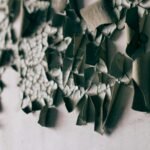
Conversely, heat can be equally hazardous. Once temperatures exceed 32 – 35°C (90 – 95°F), evaporation happens quickly, and this can leave your surface weak and brittle. A trained eye will see “dry-drag”, surface cracks, or powdery dust while sanding.
Avoid having direct heaters or hot air blowing on fresh coats, especially from space heaters. At moderate temperatures, most manufacturers recommend working between 18-29°C (64-84°F) with good ventilation. Keeping that sweet spot of skim coating temperature humidity stability will generally ensure even drying, and strong adhesion.
Humidity — How Moist Air Slows Or Saves A Skim Coat
High Humidity Effects
High humidity can increase your drying time two- to threefold. Once the air has reached saturation, evaporation will slow and in some instances, stop altogether. A surface may remain tacky, attract dust or worse, bubble under paint. If you work in a basement or a rainy season room, try the use of gentle airflow or a dehumidifier to expedite the process.
Low Humidity Effects
While very dry air is generally advantageous, it is still a gamble. When the relative humidity declines to a point where the water moves too quickly out of the surface, it will shrink and possibly develop fine cracks.
All things being equal, a moderate humidity level (40 – 60%) is the best scenario, as it makes drying more predictable and surfaces flatter. Consistent skim coating conditions while drying both before and after application is the secret to a nicely finished surface that is ready for paint application.
Ventilation, Air Movement, And Dew Point
Why Airflow Matters
Air movement is essential, but it must be controlled. Gentle cross-ventilation removes excess moisture evenly, while direct blasts from fans or heaters dry the surface unevenly. Pros prefer balanced airflow, open opposing windows, or use low-speed fans to keep the room breathing without overheating.
Dew Point And Substrate Temperature
Even in a warm room, condensation can appear if the surface temperature falls below the dew point. That thin film of moisture prevents adhesion and leads to peeling later. Check that your wall or ceiling surface is a few degrees warmer than the dew point before applying.
Expected Drying Times And Practical Checks
In ideal conditions, a thin skim coat or joint compound layer takes about 24 hours to dry. Thicker coats or humid environments can extend that to 7–14 days.
Don’t rush it; paint or sand only when the surface is fully uniform in color, dry to the touch, and free of darker spots. Some professionals use moisture meters for accuracy. Waiting just a little longer often means the difference between a wall that lasts years and one that cracks after the first season.
Common Problems Caused By Bad Conditions — And Fixes
- Cracking from fast drying — Mist the area lightly or use a retarder to slow down the set time.
- Tacky surfaces or peeling — Improve ventilation or use a setting-type compound that cures chemically, even in damp air.
- Dusty or weak surface — Adjust coat thickness or humidity; switch to a compound suited for the season.
Small environmental tweaks solve most finish failures before they even start.
Product Selection & On-Job Best Practices
Choose The Right Compound For Your Conditions
Air-dry (premixed) compounds rely on evaporation, making them ideal for warm, dry rooms.
Setting-type compounds, often called “hot mud,” chemically cure even when humidity is high or temperatures are cool, perfect for winter projects or basements.
Onsite Controls And QA
Prior to starting, it is necessary for the temperature of the materials/surfaces, substrates, etc. to be at room temperature. Whenever possible, in hot, dry weather, pre-wet porous substrates before applying water-based skim coats, so that the porous substrate does not pull moisture away from the skim coat. A dehumidifier or mild heater may be used, and direct heat should be avoided.
Continuous awareness of the skim coating temperature, humidity, and skim-coating drying conditions at any moment will facilitate consistent results throughout the year.
Quick Maintenance / Post-Finish Tips
- Allow for complete curing before painting. Regardless of how dry the skim coat seems, it’s better to wait until the entire skim coat cures allowance in order to minimize bubbling or dull patches from moisture trapped below the surface.
- Maintain constant humidity. Keep the room humidity constant for a few days following application to minimize the chance of stress cracks.
- Check and document. If cracks or dull spots appear, document the temperature and humidity in the room; it will help you isolate and correct environmental conditions before attempting to reapply.
Finish Like A Pro: Match The Conditions To The Compound
Ultimately, controlling humidity and temperature of skim coating could be more important than the compound itself. The best way to dry skim coat is to have balanced air conditions, comfortable, moderate warmth, and air moving. Then the skim coat will perform as designed. If you pay just a little attention to temperature and moisture, you will always receive that flawless, sandable, paint-ready surface.


